Saturday, April 19, 2008

It’s Hard for Me to Say I’m Sorry…


I won’t dance around the issue: I’ve been busy. Like monumentally, running-around-like-a-headless-chicken busy. I’ve already told most of my close friends and family members that if I EVER utter so much as a word about wanting to get another degree, they all have permission to physically detain me from going through with it. None of this, however, is an excuse for neglecting my readers (I know there are at LEAST three of you out there—Hi, Mom!—who have been disappointed by my recent hiatus) and going into something referred to in the culinary world (or any world for that matter) as a black hole. I won’t bore you with the details of the countless bowls of cereals, because I think you’ve already been patient enough. Borrowing the immortal words of Chicago allow me to say:

After all that we’ve been through,
I will make it up to you,
I promise to.
Luckily, I’ve got an ace up my sleeve. This coconut cupcake is guaranteed to put you in the good graces of anyone, no matter what sort of awful person they might (mistakenly) think you are. I challenge anyone to reject this cupcake and a sincere apology. It’s that good. It is based on the legendary coconut cake served at Comfort’s in San Anselmo, California, with a little of Ina Garten for good measure. I’ve swapped any cream or buttermilk for coconut milk, backed off the sugar in the cake itself and jacked up the vanilla too. As Ina would say, “How bad can that be?” Well, I’m willing to bet it wouldn’t hurt…

Coconut Cake
Ingredients:
For the cake:
¾ lb. butter, softened
2 C. sugar
5 eggs
1 ½ tsp. vanilla extract
1 tsp. almond or coconut extract
3 C. flour
1 ½ tsp. baking powder
1 tsp baking soda
1 C. coconut milk
14 oz. shredded sweetened coconut (optional)

For the frosting:
8 oz. cream cheese, softened
6 oz. butter, softened
2 C. powdered sugar
½ C. shredded sweetened coconut, for topping

Directions: Preheat oven to 170 degrees C/ 325 degrees F. Sift together the flour, baking soda and baking powder and set aside. With an electric mixer, beat together the butter and sugar until fluffy, about 2-3 minutes. Add the eggs one at a time, mixing thoroughly after each addition. Mix in vanilla and almond/coconut extract. Alternate adding the dry ingredients and the coconut milk in two or three stages, trying not to overmix. Fold in the shredded coconut, if using. Pour or scoop into cupcake pans lined with paper. Bake about 30 minutes, or until a toothpick inserted into the center comes out clean. Allow to cook on a wire rack for 5 minutes, then remove from the cupcake pans and allow to cool further.
To make the frosting, beat together the cream cheese and butter until smooth. Add the powdered sugar and mix completely. Once the cupcakes are completely cooled, spread with the frosting, sprinkle with shredded coconut, serve immediately and say: “I’m really sorry.”

Wednesday, March 12, 2008

Ricotta and Raspberry Compote

This is a delicious use of one of my favorite ingredients ever. I am referring of course to the fresh, creamy yet textured dairy delicacy that is ricotta cheese. Here it is undeniably the star: sweetened very conservatively and topped only by the simplest of berry compotes to add a little bright piquancy to the overall effect. As with most things in life, what you put into this dish is what you will inevitably get out of it, in terms of ingredients. Use the freshest ricotta available. In this recipe, I cut the ricotta with a few tablespoons of nonfat Greek yogurt, both for a smoother texture (the ricotta I got was particularly crumbly) and a lighter nutritional value overall. A quick warning to those chefs out there (like *ahem* myself) who may not feel that this recipe will not wow dinner guests: do not mistake the simplicity of this dish for its being boring. On the contrary, when it is served up in some fancy stemware it packs a visual and gastronomic punch equal to that of any other labor-intensive dessert. In this case, restraint equals elegance. It is, quite simply, a ricotta revelation.

Ricotta and Raspberry Compote
NB: I happened to use raspberries because they were both local and fresh, but any red berry will do. Simply adjust the amount of sugar and lemon juice according to the sweetness of the berries. I can’t wait to try this dessert in the height of summer with black cherries! Also, in the compote, I should have added a bit of rose or orange blossom water right before serving, but alas, didn’t have any on hand. I think it would make a great addition, so I’ve included it here.

Ingredients:
2 cups fresh ricotta
½ cup nonfat Greek yogurt
4 Tbsp. granulated sugar

For the compote:
2 cups fresh raspberries
½ cup water
Juice of 1 lemon
1 ½ cups granulated sugar
1 tsp. orange blossom water

Directions:
Combine the ricotta, yogurt and 4 Tbsp sugar in a large bowl, mixing well. Set aside. To make the compote, combine all ingredients except orange blossom water in a heavy saucepan over medium low heat. Stir occasionally and allow to come to a small boil, about 15 minutes, taking care that the sugar doesn’t burn or stick to the sides or bottom of the pan. Remove from heat and allow to cool slightly—it should be warm but not hot. Divide the ricotta mixture among four serving dishes (you can get fancy here if you want) and spoon over a few tablespoons of the compote. Serve immediately.

Serves four.

Thursday, February 28, 2008

A Quartet of Dips

Ok, ok, so I went a little crazy here. But when you’re house-sitting (read: squatting) in a house with such a fantastic kitchen, how do you not go overboard? The real impetus behind my food processor frenzy was really my totally dip-able wholewheat version of Nigella’s flatbread. It deserves more than (God forbid) store-bought hummus. No, I stand resolutely by my lifelong motto that anything worth doing is worth overdoing.

First, the bread:
Wholewheat Flatbread
(adapted from Nigella Lawson’s How To Be A Domestic Goddess):
Ingredients:
200g strong white bread flour
300g wholewheat bread flour with grains or spelt in it (Allinson’s make a nice one)
7g (1 packet) easy-blend yeast
2 tsp. salt
2 Tbsp. Greek yogurt
2 Tbsp. olive oil, plus more for greasing
Approx. 300ml warm water
To glaze:
1 egg
1 tsp. water
1 tsp. yogurt
Seeds for topping such as poppy or sesame (optional)
Directions:
Combine the flour, salt, yeast in a large bowl and make a well. Mix together the wet ingredients then pour into the flour mixture. Fold in the wet ingredients with a wooden spoon until the dough comes together then turn out on a floured surface and knead until the dough is smooth and elastic, about 8-10 minutes. Form into a ball and place in an oiled bowl in a warm place, covered with plastic wrap until doubled in size; a little over an hour. Divide the dough with a knife into about 6 pieces (more or less depending on the size you want the final flatbreads to be) and allow the dough to rest for 10 minutes. Preheat the oven to 220 degrees C/425 degrees F. Roll out the pieces with a rolling pin or the heel of your hand into an oblong egg-shape about 2cm thick and lay out on a parchment-lined baking sheet. Cover with a tea towel and leave to prove for about 20 minutes, until puffy. Mix the glaze ingredients together (minus the seeds, if using) and brush over the dough. Sprinkle with seeds then bake 8-10 minutes. While still warm, wrap the flatbreads in a tea towel to prevent a crust forming (if desired).
Now that you’ve got your delicious bread ready to dip, take a gander at some of these traditional and not-so-traditional delicious dips. Except for the tzatziki, the directions for these combinations are all the same: simply place the ingredients in the bowl of a food processor and push the little button with your index finger. To make these, we roasted about 2 ½ heads of garlic along with the butternut squash while the dough was rising, so it was all ready to go when we were.

Roasted Garlic Hummus:
1 can chickpeas, drained (water reserved for thinning, if necessary)
Garlicy mush of 1 head of roasted garlic
4 Tbsp. olive oil
Juice of 1 lemon
¼ cup toasted sesame seeds (we didn’t have tahini on hand, but this worked a treat and added a scrumptious texture to the final product)
¼ tsp each cumin and coriander
Salt and pepper to taste
Chili flakes (optional)

Roasted Butternut Squash, Parmesean and Nutmeg Dip (I know, it needs a snappier name!):
Flesh of ½ a medium butternut squash, cut into cubes and roasted until soft
½ cup Greek yogurt
3 cloves roasted garlic
3-4 Tbsp. olive oil
¼ cup freshly-grated parmesan
1 hearty grating of nutmeg (well, it depends on how much you like nutmeg…)
Salt and pepper to taste
Sundried Tomato Cannellini Dip:
1 can cannellini beans drained (water reserved for thinning—you’ll need it)
½ cup sundried tomatoes in oil, packed
½ a head of roasted garlic
½ tsp each dried tarragon and thyme
Handful fresh basil
¼ tsp each cayenne, smoked paprika and chili flakes
Salt and pepper to taste

Tzatziki (just mix these together in a bowl, no need for a food processor here):
1 cup grated cucumber
1 cup Greek yogurt
Juice of 1 lemon
¼ each chopped fresh mint and parsley
Salt and pepper to taste
Olive oil for finishing

Thursday, February 7, 2008

Panzanella

Without trying to sound whimsical, I can honestly tell you that I was introduced to this dish in the kitchen of a Tuscan winery by an extraordinary woman who makes not only her own tomato sauce, pesto, and preserves, but her own wine and olive oil as well. Now that’s the kind of life I want to have one day. Indeed, my old buddy Jenna and I gained access to the indescribable culinary enclave at La Fattoria Santa Vittoria in Pozzo della Chiana on a carefree, whirlwind post-college-graduation tour of Northern Italy in the summer of 2006. Oh, the headiness of youth!
I think it goes without saying that this rustic, fresh salad is best served overlooking a sun-drenched Tuscan countryside, but such idyllic surroundings may be hard to come by in February. Panzanella is essentially a tomato basil salad with breadcrumbs or croutons to soak up the delicious dressing and make a meal out of the affair. I’ve seen tons of variations (one Mr. Oliver even goes so far as to employ a roasted bell pepper here and there alongside his usual bath of olive oil), but as long as everything is fresh, even with the barest ingredients, you’re still going to end up with something delicious. This is peasant food at its best if you ask me, and I know of no better way to use up day old bread and avoid my least favorite activity of throwing away food.

Now I’ll admit, this recipe would undoubtedly be at its peak in summer (I don’t even want to think about the food miles implicit in the cherry tomatoes alone—but sometimes in the dead of winter was have to find ways to trick our bodies into thinking that spring is around the corner, no?), but then when summer finally does roll around, you’ll have it tried and tested to lock away in your food memory bank for a cold day like this. I can’t stress the simplicity angle enough here, however because of this, the higher quality your ingredients are to start with, the better the end result. Also, if the idea of raw onion or garlic intimidates, feel free to omit them entirely, or alternatively soak the slivered offenders in cold water for a few minutes to take the edge off. So go ahead and try this EASY little number, close your eyes and meditate on la dolce vita
Panzanella

Ingredients:
Half loaf of day-old, good Italian country bread, such as ciabatta or pugliese, cut into cubes or processed into crumbs
1 box of cherry tomatoes, halved
½ cucumber diced
1 small red onion, thinly sliced into ribbons
Small bunch of basil, torn
1 clove garlic, finely minced
3 ounces of fresh mozzarella, diced (and a few Tbsp of brine, reserved)
Good olive oil
2 Tbsp. red wine vinegar

Directions: Place the bread (either cubed or crumbed) onto an ungreased baking sheet and bake at 170 degrees C/ 325 degrees F for about 8-10 minutes (you don’t want it to get too brown, just dried out, so keep an eye on it). While that’s happening, place all other prepped ingredients in a large bowl, season with a good pinch of sea salt and fresh pepper to taste. Allow the fresh ingredients to marinade for a few minutes. Add the bread and toss to combine, checking seasonings again. Serves 2 as a main course or 3 as an appetizer.

Sunday, January 27, 2008

SlowFood Bread Class Photos

For those of you who were at the Breadmaking class, here they are: the photos that the sunday papers would love to get their hands on:

"Look at those sexy slashes!"


SlowFoodies: Please feel free to peruse the rest of my blog and try some of the recipes--I'd love to know what you think!

Old School New York Bagels

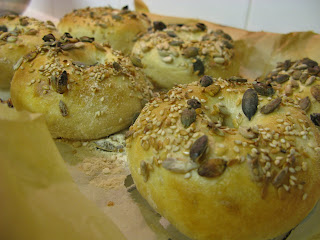
Right off the bat, I'll tell you: making your own bagels is a bit of a project. That said, I have to follow up by mentioning: it's incredibly fun and unbelievably rewarding. The resulting bagels are chewy on the outside with a tightly woven crumb on the inside, resulting in unbelievable flavor and texture. Making them does take a bit of time (about 3 hours start to finish) but believe me when I say there is nothing inherently difficult that you do in those three hours, in fact, quite a lot of it involves waiting patiently with your feet up for the sponge to rise. Although I can't take credit for this recipe (it's featured in Peter Reinhardt's The Breadbaker's Apprentice) there were numerous times when I deviated from the instructions and the results left nothing to be desired. In essence, the recipe involves mixing together flour, water and yeast into a kind of pancake-batter consistency called a sponge, allowing that to rise before adding more flour and a bit more yeast followed by some kneading to produce the final dough. After resting and forming the dough into actual bagels, they are poached in boiling water to seal the outside, creating the characteristic bagel chew, and finally baked at a high oven temperature. Not tricky, especially if you have access to a standing mixer, which I have used before, but this time—as the title of this post indicates—I went Old School! I made these on Friday for my SlowFood class; we adorned them with a mixture of linseed, sesame, and pumpkin seeds. I have also included some of the sexier bread shots from that class. I suppose one of the reasons I started making my own bagels was the lack of real bagels available in the UK; the ones you find in the bags in supermarket bread aisles are depressingly bready with no bagel flavor. Here, the bagel flavor is achieved by the addition of malt syrup, which I found without trouble at a local healthfood store. Also, if you are among those who like to eat your bagels first thing in the morning without the three-hour process, there are instructions on how to retard your prepped bagels in the fridge overnight for easy baking off in the morning (or whenever). So without further ado, may I present the real-deal bagel:

Yield: 12 large or 24 miniature bagels

Sponge
1 teaspoon instant yeast
4 cups unbleached high-gluten or bread flour
2½ cups water, room temperature

Dough
½ teaspoon instant yeast
3¾ cups unbleached high-gluten or bread flour
2¾ teaspoons salt
2 teaspoons malt powder or 1 tablespoon dark or light malt syrup, honey, or brown sugar

Cornmeal or semolina flour for dusting the baking tray
Sesame seeds, poppy seeds, kosher salt, rehydrated dried minced garlic or onions (optional)

Directions:
1. Day one: To make the sponge, stir the yeast into the flour in a 4-quart mixing bowl. Add the water, whisking or stirring only until it forms a smooth, sticky batter (thick pancake batter consistency). Cover the bowl with plastic wrap and leave at room temperature for approximately 2 hours, or until the mixture becomes very foamy and bubbly. It should swell to nearly double in size and collapse when the bowl is tapped on the countertop.
2. To make the dough, in the same mixing bowl (or in the bowl of an electric mixer), add the additional yeast to the sponge and stir. Then add 3 cups of the flour and all of the salt and malt. Stir (or mix on low speed with the dough hook) until the ingredients for a ball, slowly working in the remaining 3/4 cup flour to stiffen the dough.
3. Transfer the dough to the counter and knead for at least 10 minutes (or for 6 minutes by machine). The dough should be firm, stiffer than French bread dough, but still pliable and smooth. There should be no raw flour - all ingredients should be hydrated. The dough should pass the windowpane test and register 77 to 71 degrees F. If the dough seems to dry and rips, add a few drops of water and continue kneading. If the dough seems tacky or sticky, add more flour to achieve the stiffness required. The kneaded dough should feel satiny and pliable but not be tacky.
4. Immediately divide the dough into 4 1/2 ounce pieces for standard bagels, or smaller if desired (Note: I weighed out the dough into 3 ounce balls, not wanting the final product to be too big). Form the pieces into rolls.
5. Cover the rolls with a damp towel and allow them to rest for approximately 20 minutes.
6. Line 2 sheet pans with baking parchment and mist lightly with spray oil. Poke a hole in a ball of bagel dough and gently rotate your thumb around the inside of the hole to widen it to approximately 2 1/2 inches in diameter (half of this for a mini-bagel). The dough should be as evenly stretched as possible (try to avoid thick and thin spots.)


7.Place each of the shaped pieces 2 inches apart on the pans (Note: I got away with about 1 inch spaces). Cover with a damp towel or plastic wrap and let the pans sit at room temperature for about 20 minutes.

8. Check to see if the bagels are ready to be retarded in the refrigerator by using the "float test". Fill a small bowl with cool or room-temperature water. The bagels are ready to be retarded when they float within 10 seconds of being dropped into the water. Take one bagel and test it. If it floats, immediately return the tester bagel to the pan, pat it dry, cover the pan, and place it in the refrigerator overnight (it can stay in the refrigerator for up to 2 days). If the bagel does not float. Return it to the pan and continue to proof the dough at room temperature, checking back every 10 to 20 minutes or so until a tester floats. The time needed to accomplish the float will vary, depending on the ambient temperature and the stiffness of the dough.
9. The following day (or when you are ready to bake the bagels), preheat the oven to 500 degrees F with the two racks set in the middle of the oven. Bring a large pot of water to a boil (the wider the pot the better), and add the baking soda (and optionally, a few tablespoons of barley syrup). Have a slotted spoon or skimmer nearby.
10. Remove the bagels from the refrigerator and gently drop them into the water, boiling only as many as comfortably fit (they should float within 10 seconds). After 1 minute flip them over rand boil for another minute. If you like very chewy bagels, you can extend the boiling to 2 minutes per side. While the bagels are boiling, sprinkle the same parchment-lined sheet pans with cornmeal or semolina flour. (If you decide to replace the paper, be sure to spray the new paper lightly with spray oil to prevent the bagels from sticking to the surface.) If you want to top the bagels, do so as soon as they come out of the water. You can use any of the suggestions in the ingredients list or a combination.
11. When all the bagels have been boiled, place the pans on the 2 middle shelves in the oven. Bake for approximately 5 minutes then rotate the pans, switching shelves and giving the pans a 180-degree rotation. (If you are baking only 1 pan, keep it on the center shelf but still rotate 180 degrees.) After the rotation, lower the oven setting to 450 degrees F and continue baking for about 5 minutes, or until the bagels turn light golden brown. You may bake them darker if you prefer.
12. Remove the pans from the oven and let the bagels cool on a rack for 15 minutes or longer before serving.

Thursday, December 27, 2007

Vanilla Salted Caramels


One of the nice things about spending your time reading food blogs is that you stay up to date with current trends in food and you can get feedback on recipes before you even try them. I'll admit, I'm not a big candy-maker (I often get put off by the use of candy thermometers), but I saw three separate bloggers like myself attempt different caramels, so I thought I'd throw my hat into the ring. My edition is a rather plain caramel base, but after that was made, I coated the small squares of deliciousness with Guittard milk chocolate and topped them with a mixture of Tahitian vanilla bean paste and English flake sea salt that I picked up at my local Napa Style store (which, by the way, I'm convinced is the most amazing foodie-hangout since Williams-Sonoma and Dean & Deluca).


The wall of amazing sea salts at Napa Style was my real inspiration. I know Dean & Deluca make an amazing range of sea salts as well (including a vanilla one, if memory serves) so feel free to experiment here. Some of the salts I tasted were too sulfurous, so I went with the English flake since it was the cleanest on the palate. The salt is what makes these caramels really pop. I resisted the urge to put a big pinch in the caramel base, however, and I think the balance turned out well. If I were to do it over again (and I'm sure my family will demand a repeat of these next Christmas due to the newcomer's overwhelming popularity among the old standbys on the cookie platter) I would probably add the bulk of the vanilla to the base rather than mixing it with the salt (the pure whiteness of the topping would be more elegant). These also make excellent house-warming or host/ess gifts, travel well, and last at least 2 weeks (but you'll never know since they'll be gone so fast!)
Vanilla Salted Caramels

Ingredients:
4 Tbsp (1/2 stick) unsalted butter, plus some for greasing the pan
1 ½ cups heavy cream
2 cups sugar
½ cup light corn syrup
Pinch salt
1½ teaspoon vanilla extract, plus the scrapings of one vanilla bean
12 oz. milk chocolate, melted
1 Tbsp flaked sea salt (I used some from a specialty store, but Maldon would work fine here)

Directions: Grease a 9-inch square baking pan. Combine all ingredients except vanilla in a small saucepan and turn the heat to low. Cook, stirring constantly, until the sugar dissolves, hen cook, stirring only occasionally, until the mixture measures 250 degrees, or hard ball stage on a candy thermometer. Stir in the vanilla and pour into the prepared pan. When the mixture has cooled to room temperature, remove the block of caramel from the pan and use a sharp knife to cut it into small squares. The chocolate can be tricky—it needs to be close to body temperature to coat the caramels without pooling when you set them down. I melted the chocolate over low heat on a double boiler, and then allowed it to sit at room temperature for a few minutes. Dip the caramels into the chocolate then place on parchment. While the chocolate is still wet, sprinkle conservatively with the sea salt and don't remove from the parchment until the chocolate is completely set. Makes about 48 caramels. If desired, wrap in small squares of wax paper or place in petit fours cases for presentation.